April 5, 2011

Sunday- Lacy Pancake a.k.a Roti Jala

Roti Jala is a Malay word which literally translated as "Net Bread". Lacy Pancake sounds more elegant tho ;) I made this for makan-makan session at my sister in law place yesterday and I believed I made too many Roti Jala sapai tak habis makan T_T huhu [we also ordered a large batches of BBQ Chicken, and that's part of the reason why people weren't attacking my dish ;p]
Despite matching it with creamy chicken curry, I replaced it with extra creamy beef and potato curry instead. My waistline kembang kejap semalam sbb creamy sgt plak curry tu hehe  owh, I forgot to snap the curry picture. 
Anyway, I believe most of you know how to make this Roti Jala kan.. I used the recipe below, and made some adjustment since the batter is kindda too thick for my lattice mold. Whenever I used the mold, the first few rounds would always ended up with disaster. Instead of flowing out smoothly from the mold, the batter chose to drip and I have thousands of dot on my pan..sigh 
I have to adjust the batter then until I get the right consistency for the batter to flow down smoothly.  [Tips: Just add a lil more oil(if it's a thick natter) or flour (if it's a thin batter) and try again] Owh I am so an amateur cook..hehe
ROTI JALA “NET BREAD” OR MALAYSIAN LACY PANCAKES 
{Recipe taken from RasaMalaysia}
Yield: 20 pieces
serving: 4 person


Ingredients:

1 3/4 cup all purpose flour (1/2 lb) 
1 1/2 cup low fat milk 
1/2 cup water 
1 egg 
1/2 teaspoon salt 
3/4 teaspoon turmeric powder 
1/2 tablespoon oil Ghee or butter (to grease the pan)

  1. Sieve the flour and set aside.
  2. In a big bowl, mix all the ingredients well together (except the oil) and strain the batter.[I  used a blender to get a smooth batter] 
  3. Add in 1/2 tablespoon of oil and set aside. 
  4. Heat up a pan with medium heat and grease it with some butter or ghee. 
  5. Pour some batter into the mold and transfer the mold to the pan. 
  6. As the batter flows through the holes of the mold, make circular rounds around the pan to form the netty patterns. 
  7. After the top is set and done or when the bottom turns light brown, transfer the Roti Jala out and fold it into triangle shape. [ I choose to roll like a spring roll] 
  8. Arrange a few Roti Jala on a serving plate and add some curry chicken/beef chicken/durian sauce/maple syrup+butter on the side and serve immediately.

April 2, 2011

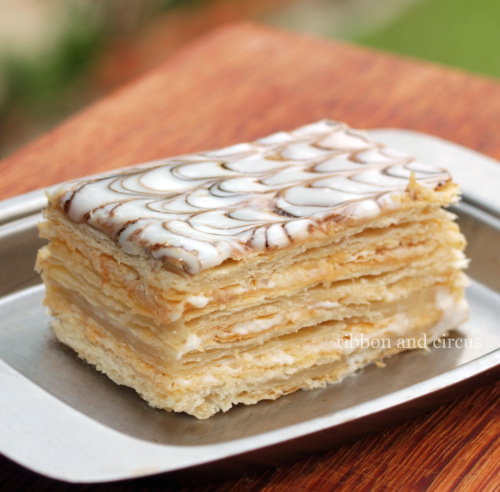
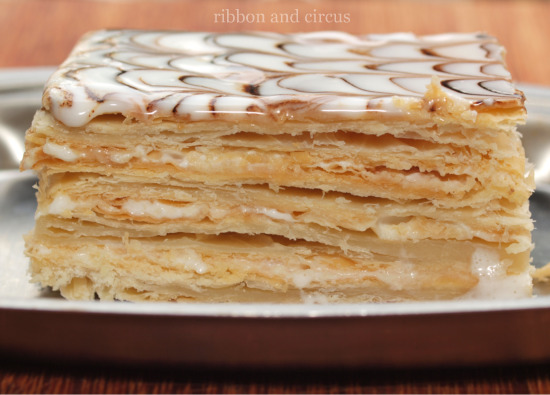
Saturday- The Napoleon Cake a.k.a Mille-feuille

This is the dessert I've been waiting for. This is it.The Napoleon Cake. It's one of the scrumptious food seen in Eat.Pray.Love and I was keen to try [eat] it since then. I love it. So did my husband. Adam? he's too young for this hehe..
the pastry cream is hiding somewhere between the layers
 DLLurpak has listed few "eat scenes" in EPL including this Napoleon cake in her post here. [psst..she's going to Italyyy soon for her gastronomic holiday!!!..buon viaggio!] 
cair kena matahari..the icing is melting..
Back on the napoleon cake, here's some info from Wiki on this dessert;


"The Mille-feuille (French pronunciation: [mil fœj], "thousand-leaf"), vanilla slice, cream slice, custard slice, also known as the Napoleon, is a pastry originating in France. The name is also written as "millefeuille" and "mille feuille. Traditionally, a Mille-feuille is made up of three layers of puff pastry (pâte feuilletée), alternating with two layers of pastry cream (crème pâtissière), but sometimes whipped cream, or jam. The top is usually glazed with icing or fondant in alternating white (icing) and brown (chocolate) strips, and combed. Alternatively the top pastry layer may be dusted with confectioner's sugar, cocoa, or pulverized nuts (e.g. roasted almonds)"

It's not that difficult to make this dessert. The steps sounds simple enough. With a store bought puff pastry, it's just a matter of whipping the pastry cream and assembling all of them together. I used From Yeast to Zest's pastry cream recipe and watched few experts assembling it on YouTube clips.  


Napoleon cake a.k.a Mille-feuille
{Recipe taken from From Yeast to Zest}
Please visit From Yeast to Zest blog for the full recipe. It's too long to paste it here hehe 
Note: 
1. If you're lazy enough to do the pastry cream, you can opt for whipped cream or jam with fruits like berries.
2. In order to get to get a nice flat top, make sure you squeeze the puff pastry between 2 baking pans while baking it... ..[refer to YouTube video above if you didn't get what I mean]


"Life is unpredictable, eat dessert first"..Have a nice weekend ;)

March 30, 2011

Tuesday-Poached Pear in Cage

Here's another excellent dessert recipe I made yesterday. There are 3 reasons why I baked this dessert. First: I have three untouchable pears left in my fridge, no ones seem interested to finish them off. Secondly: the lattice pattern and thirdly; the whole idea about poached pear.I looooovvvveeee 'cooked/baked-fruit' as dessert. The combination from fruit aromas mixed with the spices i.e cinnamon and cloves are just heaven..Same goes to this cage puff. BigDaddyO loved it so much and requested me to do another batch of it. he he insyaAllah =p
These puffs were rather less elegant than the one I saw on the internet, [one of mine got a big hole at the back], but trust me, no one will care once they take a bite. he he Google on 'pear in a cage' and you'll end up with few photos on how these puffs should look like..  My puffs are made by amateurish home chef je =p 

Poached Pear in Cage 
{Recipe is inspired and taken from Sprinkle Bakes's Honeyed Pear in Puff Pastry..TQ =D}
Yield: 2 medium sized puff
  • 4 small pears-I used 2 pears
  • 1 sheet of ready made puff pastry dough, thawed
  • 4 cups water-half
  • 2 cups sugar-half
  • 1 cup honey-I used golden syrup
  • 1/2 lemon-omit
  • 1 vanilla bean, seeded with hull reserved
  • 3 sticks of cinnamon-1 stick
  • 6-8 whole cloves-omit
  1. Peel pears and core from the bottom. 
  2. In a medium saucepan, combine the 4 cups water, 2 cups sugar and 1 cup honey. Bring to a simmer over medium-high heat. When the sugar has melted, add the pears, vanilla seeds and hull, 1/2 lemon, cinnamon and cloves. Simmer pears until they are fork tender. This can take 20-40 minutes, depending on the ripeness of your pears. 
  3. Preheat oven to 200 degrees.
  4. When the pears are soft, remove them from the pot and allow them to cool slightly. Discard solid pieces from saucepan.
  5. Cut 2 medium size of puff pastry in square. about the same size as your pear.
  6. Put the pear on the puff pastry [bottom layer]
  7. As for the top layer, make several cuts just like below lattice pattern, and stretched it a lil bit, be careful not to tear it, [or you'll end up like mine-the big hole huhu] and put it on top of the pear. secure both end with fork or your hands. 
  8. Baked it for 15-20 mins or until the puff pastry turns golden brown. Serve with ice-cream. 
lattice pattern
                                             

March 25, 2011

Adam cooks on Monday..err..Friday he he

Alas, I'm few days late, but I still wanna squeezed this week "Adam cooks on Monday [ACOM]" today.. Adam and I went to the library last Monday, had our lunch outside, and by the time we were finally home, we both were so tired from the long walk. [Mommy was the one who got tired the most actually, had to carry him around after he tired to walk himself =p] So no cooking mooking on Monday. 
As usual, Adam did the easiest part only, and this time he got to sieve the dry ingredients. I helped him pour the ingredients on the sieve and let him kacau2 with a spoon. Memang mengacau pun after that.. he really kacau me by asking me to carry him around, messing the floor with the butter, sepah2kan my bowls and pots, and nearly tumpahkan tepung yg dah disieve tu.. err..err.. "I'd got to bring him out of my kitchen.." Switched on the TV, luckily Mickey Mouse Clubhouse was on it, and he got excited & left Mommy by herself in the kitchen, with all the 'great' mess T_T 
No baking-making-caking after this..I'll let him spread the Peanut-Butter-Jelly instead. =P I should choose recipe with less preparation time and steps sepatutnya.. Obviously, I'm dealing with a 20 months toddler, who couldn't stand still even for a minute! And ade je new things that will catch his interest.. tu nak pegang, ini nak masuk mulut.. =p 
So here's my version of Steamed Zebra Cake. Mine is a bit hideous, isn't it. The taste is there, but there's no zebra stripes whatsoever inside.. Outside, adelah selai dua stripes.. =P And I forgot to tap the cake pan before I put it in the steamer, so there you go, uneven-rocky-mountainous top cake .. isk isk.


Steamed Zebra Cake {Recipe taken from Rima Bisous A Toi-Thanks!!!}
Yield: 8 pieces [I did half butter only]

Ingredients
(A)
  • 8 eggs
  • 250g sugar
  • 1 tbsp emulsifier
  • 1/2 tsp salt
(B)
  • 250g flour
  • 50g milk powder
(C)
  • 50g butter, melted
  • 50g fresh milk
(D)
  • 75g margarine, melted - I used butter
  • 2 tbsp instant coffee mix with a little hot water
  • 1 tbsp mocca paste - I used mocca latte paste
  1. Heat steamer.. greased a 24cm round pan.
  2. Beat ingredients A until thick and fluffy.
  3. Add in sifted B.
  4. Mix well. Weigh and divide batter into two equal part.
  5. Add C to one part, mix well, set aside.
  6. Add D to another part, mix well, set aside.
  7. Pour plain and mocca batter alternately till finish
  8. Steam on medium high fire for abt an hr or till set
  9. Remove from pan, slice into pieces. Serve.


March 22, 2011

Tuesday- Chocolate Coconut Cupcakes {CCC}

I baked a dozen of chocolate coconut cupcakes[CCC] this morning. EARLY this morning. Lately, I've went to bed earlier than I usually had and woke up in the wee wee hours of the morning. 

Tired, perhaps. Or over-ate. =P 
While some people despise the taste of coconut in their food especially desserts like cake, candy or ice-cream, I'm on the other hand, love most food with coconut flavor. Especially those Raya cookies with coconut flakes inside, kuih ketayap, and who can forget the delectable Bounty chocolate bar. :D
Same goes for this cupcake, I love the taste combo even though the chocolate flavor somehow overpowering the coconut's a little bit.Just a lil bit. Maybe I should reduce the cocoa powder to 3 tbsp. Anyway, it's edible hehe. So long Mr. Tong Sam Pah. I spread some cream cheese [left-over from the pumpkin roll] as the cupcakes topping and sprinkled them with toasted coconut flakes. Luckily, the imbalanced taste of chocolate-coconut was saved by the sweet & creamy cream cheese topping and coconut-aroma flakes. :D BigDaddyO'haven't give his take on this cupcakes yet. I packed two for him to munch in his office. 

Anyway, here's the recipe. Give this recipe a try, will you? hehe
Chocolate Coconut Cupcakes [CCC] 
{ Recipe taken from Sweet Paul}
Yield: 12 large cupcakes
  • 1/2 cup unsalted butter, softened
  • 1/2 cup sugar
  • 3 eggs
  • 1 cup plain flour
  • 1/4 cup shredded coconut
  • 4 tablespoons good quality cocoa powder
  • 1 1/2 teaspoon baking powder
  1. Preheat oven to 350F.
  2. Beat butter and sugar until pale.
  3. Add eggs, one at a time. Mix well.
  4. Add flour, coconut, cocoa and baking powder.
  5. Mix well.
  6. Pour the batter into a 12 cup buttered cupcake tin.
  7. Place in oven and bake for 12-15 minutes.
  8. Cool on a wire rack.
  9. Spread topping and sprinkle with toasted coconut flakes. 


March 9, 2011

Wordless Wednesday- Asparagus?

United we stand, together we fall...

I'm tiring of cooking asparagus in the same way, stir fried with soy, garlic and ginger. So far, those flavors are match made in heaven for asparagus, to my palate at least. But I'm getting enough of it..

How do you cook your asparagus? 

February 17, 2011

Tasty Thursday- Cranberry-Orange-White Choc Chips Scones

Before putting it in the oven...
After taking it out of the oven..
Recipe taken from Eat Real's Scone Four Ways.. TQ2..it's a keeper!!

February 1, 2011

Tasty Tuesday- Tangerine-shaped Pineapple Tart

Sorry for not being around that much. I've been putting my nose on my sewing machine lately. It's my new found hobby and there're so much things to learn and I'm all excited for it. hehe 

So, what's up? For us, we're going back to Melaka, visiting my parents and siblings this CNY holiday. Oh I miss them so much already..wish I'd a Mary Poppin's umbrella with me right now.. [oh wait, Doraemon's pintu sesuka hati is way easy hehe].. we also planned to go for Adam's med check up and shots at Prince Court Med Centre [PCMC] and maybe spend a night or two at our KL home. 

My sisters have been asking for Adam every time I phoned them this week. They're all excited to meet Adam and eager to spend time with him. [I'll have my own sweet time..yeay..] Adam is the first grandson and nephew of our family and yet, my family didn't get to meet him that frequent. So you could imagine how much my family especially my parents miss him... I bet they'll have some marvelous time together. I can't wait for a picnic, shopping, visit kambing2, hehe, cooking with my mom, my dad's lecture on various topics, my sisters' jokes, laughters and tears, meal times esp dinner and solat jamaah... 

Since my family is really into pineapple tarts and it's CNY celebration, so I made a jar of it [about 100 pieces of big tarts] for them. I totally forgot to count BigDaddyO in since he also crazy over this tarts. So I might have to stay up tonight preparing another batch of tarts for him hehe.. 
The recipe was taken from my previous Flower-shaped Pineapple Tart.

Okay gtg now.. I need to finish off my sewing project, then bake trays of tarts, 2 cakes, and if the weather permits, I might also making some macarons for my family. It's been raining cats and dogs these few days!! Humidity plays a large part in making this little beauties. Soggy day was not a good day to make macarons. It'll take few hours for the batter to dry which normally took about half an hour only. 
okay..can't wait to go back to Melaka and have fun, fun fun.. Org Jasin a.k.a Lurpak, jgn jeles kay haha.. I'll be back with load of photos..and foods :D :D 


January 7, 2011

Friday- Ang Ku Kueh

Since I still have tonnes of banana leaves inside the fridge, so I Google-d out recipes that will make those leaves away hehe and I ended up with Ang Ku Kueh. 

There are lots of Ang Ku Kueh recipes on the net, but I found Sonia's Nasi Lemak Lover version was very helpful with a clearer methods and aided with pictorial. Thanks Sonia! You can get the recipe from the link above. 

It was my first Ang Ku Kueh and I did it while Adam took his afternoon nap. I had all the time that I want to try this new recipe. It turned out well, even though the Chinese character on the top part weren't that clear hehe.. May be I should press the dough into the mould harder next time. 

The kueh was not too sweet, just perfect for my taste buds. and BigDaddyO's. hehe I love this kueh so much but it was very rare to find it in my area.  as long as I could remember, the last time I ate it would be 2,3 years back..

Adam anyway refused to eat it and only get to taste it after the kueh was almost finished. I make 10 kuehs and ate 3 of it.. the rest went to BigDaddyO tummy. hehehe


January 6, 2011

Thursday- Nasi Lemak 20 cent

BigDaddyO and I watched TV show a couple night ago and we saw this nasi lemak wrapped in banana leaves on it and it drool me big time that night hehe.. Straight away I planned to skip the meal on the menu planner for this nasi lemak. 

So, early in the morning, Adam and I went to the wet market to find banana leaves and it cost me SGD3 for 10 big banana leaves. "Take it or leave it, cannot buy less than that.." and I went home with a bulk of banana leaves with me.. T_T
Nasi Lemak 20 cent is a simplified version of all the nasi lemak we have in town today. Today nasi lemak was so overrated with all kind of side dishes and it's way too much for me. I.e. of side dishes are fried chicken, fried fish, hot dog, sambal udang up to sambal puyuh, all type of veges, all type of fish ball and fish cakes.. way too much..and yet for this nasi lemak 20 cent, it was so original and humble. Only egg, sambal and fried anchovies are allowed inside. And sometimes, cucumber and nuts. 

This 20 cent nasi lemak was very easy to prepare since it would only require nasi yg betul2 lemak and sambal yg betul2 sambal  hehe the rice must has a balance taste of coconut milk, ginger and salt with nice pandan fragrant.. and for the sambal, it must be in between sweet, sour and salty. The extra accessories as fried anchovies, cucumber, nuts and eggs are up for you to put. I forgot to buy egg, so no eggs for the wraps. 
The best part is when you unwrapped the banana leaves. The combination fragrant of banana leave with the rice was so aromatic. Remember to smoke the banana leaves first before you wrapped the rice and etc inside. 

Any nasik lemak recipe [go google..hehe] will do for this nasi lemak 20 cent. the most important is the wrapper, the banana leaves itself. 

that'll make a big different.. and I still have tonnes of banana leaves in my freezer..huhu

p/s: this really reminisce my early school days..my mom always used banana leaves to wrap nasi lemak, nasi goreng, or nasi bungkus for my Ko-Q days. My dad would take the school bags with him [after the school time over] and handed us the wrapped home-made lunch. and then, my sister and I would eat it in a quite canteen corner and wait together until the club session started. ...Oh I miss her..