June 28, 2011

Tuesday- Manhattan Cheesecake

"The king of cheesecake, and every local cafe, restaurant or shop will have this traditional Big Apple classic. You can serve it with a variety of fruit compotes." 
~Eric Lanlard, Home Bake 

I always have such a hard time choosing cheesecake. Put me in front of a cheesecake display, and I'll go numb. It would take ages to get to the right one, which usually either flavored or topped with fruit, nuts, or drizzled with chocolate. Frankly, I'm not the biggest fan of plain and dull-looking cheesecake, except for this one. This is the one that I like and dislike the most he he Plain, yet so rich and creamy. 
Verdict-The base crust is thick and not soggy, which I like. The filling part is creamy and tangy, a cheesecake taste that I always after.. but thumbs down to the soured cream topping..ugh..wished I had a tin of sweet cherries to eat this along with. 
Psst..I have not been in a mood to do any blogging-related thing lately. I'm having a writing, cooking and foodographying block..naah 3 in 1.. ;p I'll write, cook and foodograph some more when the mojo is back.. ;)

Psst..Psst..I'm going back to Melaka this weekend and will stay there for 2 weeks!! Yippee!! But before that, since my husband had to fly somewhere during that weeks, I had to settle with MAJOR ironing job first.. isk isk...

Manhattan Cheesecake
{Adapted from Eric Landlard, from Home Bake recipebook}
Serves 10-12

Preparation time:20  minutes+resting and chilling
Cooking time: 45 minutes

Ingredients:
For the base:
75g unsalted butter, plus extra for greasing
300g digestive biscuit, crushed


For the filling:
1kg cream cheese (the drier the better)
250g caster sugar
3tsp plain flour
1 tsp vanilla extract
finely grated zest and juice of 1 lemon
3 large eggs
300ml soured cream

For the topping:
150ml soured cream
1tbsp caster sugar
icing sugar, for dusting


1. Preheat the oven to 180C. Grease the base and side of a 23cm or 9 inch springform cake tin with extra butter, and line the base with baking paper

2. For the base, melt the butter in medium pan and stir it into the biscuit crumbs. Press the mixture into the bottom of prepared tin and bake in the preheated oven for 10 minutes. Cool on the wire rack while preparing for the filling

3. For the filling, increase oven temp to 220C

4. In a mixer fitted the paddle attachment, beat the cream cheese at medium low speed until creamy, about 2 mins. Then gradually add the sugar, then the flour. Continue by adding the vanilla and lemon zest and juice, then whisk in the eggs, one at the time. stir in the soured cream until well blended. the batter should be smooth, light and somewhat airy. 

5. Pour the filling into the prepared tin. The top should be as smooth as possible. Bake in the preheated oven for 10 mins. Reduce the oven temp to 140C and bake for 25 mins more. if you shake the tin, the filling should have a slight wobble. Turn off the oven and leave the cheesecake inside the oven with door closed. The cheesecake may get a slight crack on top as it cools.

6. For the topping, combine the soured cream and caster sugar. Spread over the cold cheesecake right to the edges, then refrigerate overnight. Dust with icing before serving.

June 25, 2011

Friday- Singapore Chicken Laksa {using spaghetti}

''Most restaurants (and hostesses) that feature pasta provide guests with a large spoon as well as the knife and fork. The fork is used to spear a few strands of spaghetti, the tips are placed against the spoon, which is held on its side, in the left hand, and the fork is twirled, wrapping the spaghetti around itself as it turns. If no spoon is provided, the tips of the fork may be rested against the curve of the plate.'' ''The New Emily Post's Etiquette,'' Elizabeth L. Post, 1975 By CRAIG CLAIBORNE 

The above excerpt is from NY Times.com, which highlights the right way of eating spaghetti, using fork and spoon. Instead of fork, I choose to twirl it with a pair of chopstick and Chinese soup spoon this time he he 

This chicken Laksa is specially made for Food Pixel Contest by Dario Milano. There's no grand prize, and everybody signed up for critiques and fun! Since the latest contest theme is spaghetti, I'd to substitute the laksa noodles to angle hair spaghetti. FYI, this is not a new thing-read: the subs. We'd been doing this for years already. 
This flavorful noodle soup, is made with coconut based sauce that is scented with rempah paste and served with any number of condiments. Sometimes people called curry mee. I knew I could easily ordered this at most of the hawker streets here, but I choose to make it from scratch today. Such a sweet time of headache he he 
Anyway, this was my first attempt making Chicken Laksa and the result was not bad at all. The taste is almost the same like hawker-styled Chicken Laksa. My only concern is the sidekick, the chili oil. Perhaps I should put belacan [shrimp paste] next time? *sneeze**sneeze*

Singapore Chicken Laksa Recipe
{Adapted from Almost Bourdain's Curry Laksa}

Serves 6-I halved the recipe tho

Rempah Paste:
20 Asian shallots
10 cloves garlic
10 dried chillies, soaked in warm water
10 fresh red chillies
2 tsp toasted belacan-
3 tbsp dried shrimps, soaked in warm water
6 candlenuts (buah keras)
3 tbsp curry powder

5 tbsp oil
3 stalks lemon grass, bruised
3 sprigs curry leaves- skipped
1 litre chicken stock
1 litre thick coconut milk
salt to taste
Toppings:
Lime, quartered
200 g tofu puffs, cut into halves
300 g bean sprouts, blanched
3 hard boiled eggs, halved
2 pieces fried fish cakes, sliced-skipped
12 large cooked king prawns-I subs it with chicken breast
12 seared fresh scallops-skipped
600 g rice vermicelli noodle (Bee Hoon), blanched- I subs it with angle hair spaghetti

Method

  1. To make Rempah Paste: Mix all ingredients and pound into a paste with mortal and pestle, blender or food processor.
  2. Heat up oil in a soup pot, saute rempah paste, lemon grass and curry leave until fragrant.
  3. Add chicken stock and bring to boil.
  4. Lower heat and leave to simmer for about 10-15 minutes.
  5. Add thick coconut milk and bring to a boil again, stirring all the time to prevent it from curdling.
  6. Add tofu puffs and bring to a boil. Add salt to taste.
  7. To serve: Divide spaghetti and bean sprouts into individual bowls. Spread prawns, scallops, eggs and fish cake on top. Pour curry gravy and tofu puffs over and serve immediately.
Chili oil
{Adapted from RasaMalaysia}

110g chili paste
25g garlic, pounded
175ml to 200ml oil
50g dried shrimps, soaked with water-I added
Method

Blender both chili and dried shrimp together until it become fine paste. Saute garlic and chili-dried shrimp paste in oil until the chili disintegrates and oil floats to the surface. (Use this to garnish when serving.)

June 20, 2011

Sunday- Lovemisu

Sweets, I feel, are best enjoyed in small doses. Their ability to delight is indirectly proportional to their sizes.
~Shirley, Køkken69, February 2011.

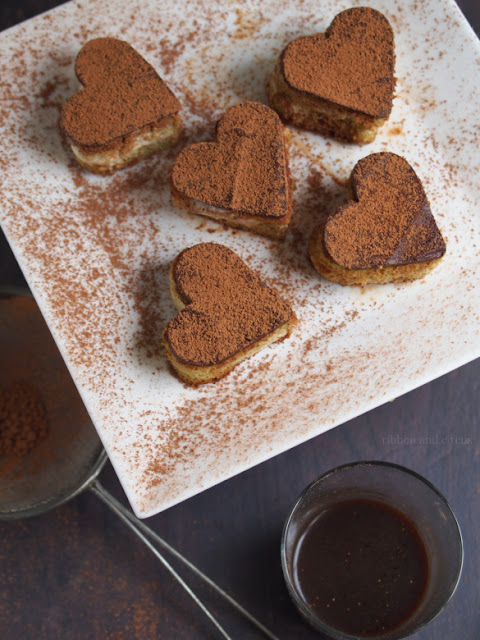
I second that. A small amount of these mini tiramisu hearts are just perfect for a small family like us.  These petits fours are made for my other half as a Father's day's special treat. Happy Father's day, BigDaddyO..! We both 'tiramisu heart' you.. hi hi :)
My first encounter with Tiramisu was in 1999. I was in Tronoh at that time. 44 lbs lighter. Single and unavailable. I bought my first Tiramisu at a small corner bakery in JJ Kinta City. The Japanese sounded dessert at that bakery tasted so good, and it was my must-bought cake every time I went to KC, until it was closed few years afterwards. And that's made me turned to Secret Recipe's. Sigh
Ten years later, my first attempt with Tiramisu took place. 22 lbs heavier. Newly wed with 6 months bump. Found myself with a quick Tiramisu recipe from Myresepi, it was a success, even though it was a tad sweet for me. However, it brought me to a new perspective on dessert making. 1. Desserts don't always have to be fruits or jellies. 2. Fancy sounded desserts are not that difficult to make. :) I always made this dessert every now and then since then {esp on special occasion} and varied them in few ways; traditionally or in dainty glass. :)


Anyway, I decided to call these minis, Lovemisu. Sounds cuter.. ;p Tastewise, same like the traditional Tiramisu.. obviously..FYI, the library has doubled the book loan quota until end of July. I was so excited and borrowed few extra books on desserts. Hopefully, I'd time to share few recipes with you guys. Sorry for the long miss appearance.. I was plain busy..err.. with chores. :P


Lovemisu
{Adapted from Tiramisu Hearts, Petits Fours A Fine Selection of Sweet Treats,  published by Murdoch Books}

Makes 24

A ready made sponge cakes-2
1 tbs instant coffee powder
60 ml boiling water
2 tbs coffee liquer- I subs it with coffee emulco
100g dark choc, chopped
2tbs unsweetened cocoa powder

Filling
1 large egg
2 tbs icing sugar
1 tsp vanilla extract
150g mascarpone cheese {teringat kisah Cik Som hi hi}
60ml cream, whipped to soft peak
  1. Grease and line the base and side of a 20x30cm baking tin with baking paper. Line a baking tray with baking paper.
  2. Cut each cake horizontally into three 8mm layers. Combine coffee, boiling water and liquer in a small bowl. set aside to cool. Brush each of the layers with the coffee mixture. 
  3. To make the filling, beat the egg, sugar, and vanilla in a bowl using electric beaters until pale and creamy. Fold in the mascarporne cheese and cream. 
  4. Place on layer in the prepared tin and spread with the filling. Top with another layer of sponge. repeat until finish. place in freezer for 40-50 mins or until firm. Use a 4cm heart-shaped cutter to cut out 24 hearts. 
  5. Melt the chocolate in a heatproof bowl over a saucepan of simmering water, ensuring the bowl doesn't touch the water. stir until melted. Pour on prepared tray. spread the thickness of 2mm with spatula. Allow to set, then cut into heart shape using the heart cutter used for the cakes.
  6. Transfer the chocolate hearts and place carefully on top of the petits fours. Refrigerate until needed. 


June 17, 2011

On Family and Food II

I love taking photos especially on food and of course, Adam. The followings are some photos to feed your eyes.. I'll provide the link for the recipe by request. lol [oh..am I that lazy?]
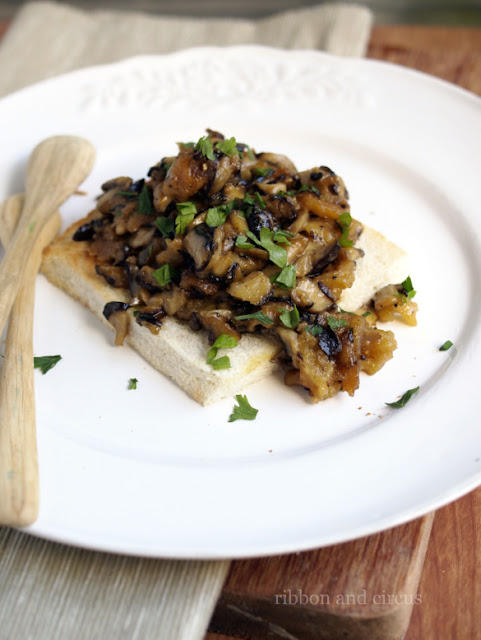
Mushroom Toast...a must-have-weekend breakfast.. 


Sticky Caramel Chicken

3 cheese ravioli with cream sauce for the little guy

Mushroom Beef Burger


Chicken Tandoori, Cucumber-Tomato Salad and Rice
Taking his first MRT ride :D 


June 10, 2011

Friday- Heaven Chocolate Tart with Pistachios

Firstly, I would like to thank you guys for all the get-well-soon wishes, be it from comment or emails. Alhamdulilah, we both are getting better, just a little bit of coughing here and there. 

Cik Som, Kak Lili, Kak Yat Easybakesdari jauh ku pohon maaf he he FYI, I made stuffed crab and it was a bit disaster ha ha thus no photo uploaded =P I really wish I could attend you guys better {read: you readers}. No more 'promises' in the future. I'm so bad at keeping up with it. :( Do I need to arrange a giveaway then? Naah..this is not a promise okay.. =p
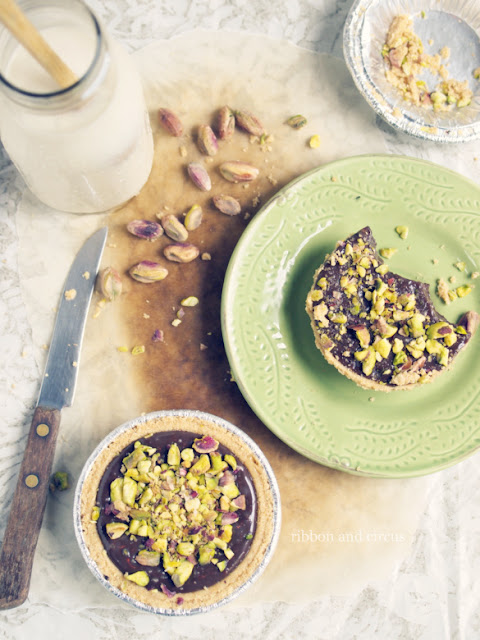
Anyway, back to the this rich chocolate tart. The recipe was taken from my previous entry, Heaven Chocolate Tart. To make it different, I sprinkled some crushed pistachios as topping this time. Berterabur. But home-made food are supposed to look rustic right? {lame excuse}

Pistachios remind me of my boarding school days. There were few motivational sessions arranged by our school during our SPM year. In one of the session, we were told by the renowned motivator, I forgot his name duuuh.., that some seeds and nuts are 'brain foods", and he named us few of them including pistachios. We were like, "aah..what's the name again? must get that weird-named nut now.." {Note: Pistachio was not this popular back then} Since that day, most of the student were snacking on that pink-greenish nuts at all time. Besides yellow and black raisins. lol
I wouldn't dare to ask my father to bought me one, since it was quite expensive. Out of nowhere, he bought me one jar eventually. Happy. We were told to take 7 or 5 pistachios and raisins a day and I did it religiously. Not sure whether the nuts helped or not, but I scored my SPM well tho. By the end of the day, nuts or no nuts, one still have to put his/her nose between the pages to score well right? 
Anyway, many thanks to Cik Mat Gebu for 'promoting' my blog earlier this week. This humble page of mine was flooded with visitors since then. Thank you for being one of my follower, CMG. You make my day! :)

June 7, 2011

Tuesday- Hainanese Toast Bread and Soft-Boiled Egg

Comfort food are best served when you're sick. Be it a cold or a heartsick.

Both Adam and I are sick right now. Down with mild fever, some cough and runny noses. Nothing to be worry about actually. Except that, nightmares await me every time I try to feed Adam his med. Sigh.

On the other hand, these toast and soft-boiled egg are one of my favorite comfort food. I would usually eat this toast more during my non-runny-nose-days albeit the diet regime I'd to obey. 
The Hainan bread is so fresh and soft. To me, the best way to eat them is to toast them, and spread them with kaya+butter combo [please don't burn it like mine..hangus..] The other way of eating them best is to dip them [plain] with soft-boiled egg or creamy chicken curry. * Two-thumbs up* 

Okay, I need to get back to Adam. He's awake and keep asking me to play with him. I leave you guys with recipe on how to get the perfect soft-boiled egg. 

Perfect Soft-Boiled Egg. 
{Adapted from Iphone4 Apps-Farm Pride Egg Timer}

1. Place eggs into saucepan and cover with cold water.
2. Begin to boil water on medium heat.
3. Once the water reach boiling point, reduce the heat to simmer.
4. Simmer them for 3.5 minutes. 
5. Serve them immediately. :D

{Note: The time stated varies with egg-sizes, large-3.5 minutes, XL-4 minutes, Jumbo size-6 minutes}